Single server: upgrade
A single server installation is being considered a non-production installation. For a production installation some kind of orchestration or failover should be applied. A single server installation of FOLIO is useful for demo and testing purposes.
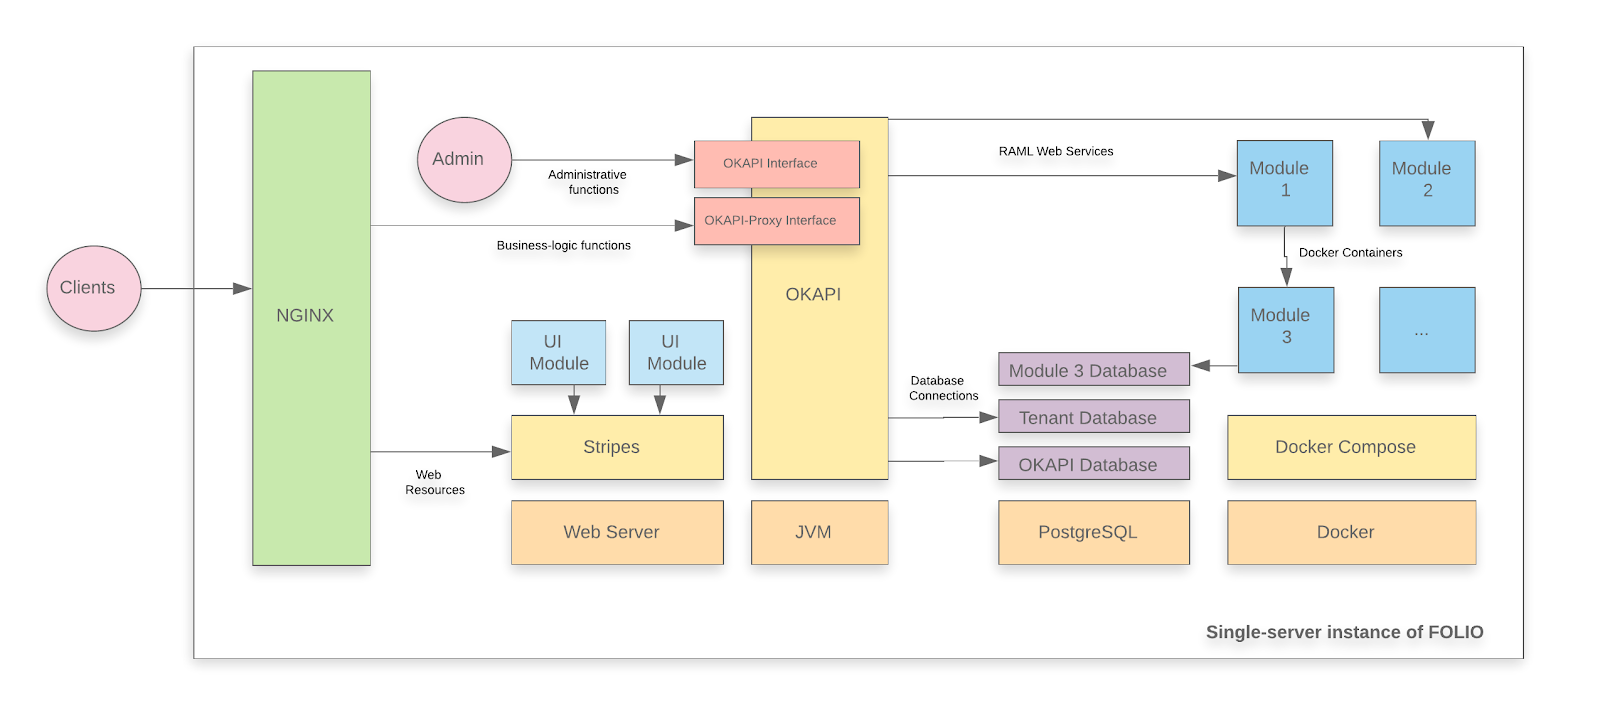
A FOLIO instance is divided into two main components. The first component is Okapi, the gateway. The second component is the UI layer which is called Stripes. The single server with containers installation method will install both.
Upgrade-based installation
This is a documentation for an upgrade of your FOLIO system.
-
It assumes that you have already successfully installed a FOLIO system and now want to upgrade your system to Poppy.
-
This documentation shows how to upgrade to a platform-complete distribution of Poppy.
-
Throughout this documentation, the sample tenant “diku” will be used. Replace with the name of your tenant, as appropriate.
System requirements
System versions
| System Type | Version referred to in this manual |
|---|---|
| Operating system | Ubuntu 22.04.2 LTS 64-bits |
| FOLIO system to migrate from | Orchid CSP#5 (R1-2023-CSP-5) |
Hardware requirements
| Requirement | FOLIO Platform Complete |
|---|---|
| RAM | 40GB |
| CPU | 8 |
| HD | 350 GB SSD |
I. Before the Upgrade
First do Ubuntu Updates & Upgrades
sudo apt-get update
sudo apt-get upgrade
sudo reboot
Check if all Services have been restarted after reboot: Okapi, postgres, docker, the docker containers (do: docker ps –all | more ) , Stripes and nginx.
These are the Poppy Release Notes Do these actions before the upgrade:
From Poppy Release Notes:
More preparatory steps
There might be more preparatory steps that you need to take into account for your installation. If you are unsure what other steps you might need to take, study carefully the Release Notes. Do all actions in the column “Action required”, as appropriate for your installation.
II. Upgrade Okapi and Prepare Backend Upgrade
II.i) Fetch a new version of platform-complete
Fetch the new release version of platform-complete, change into that directory:
cd platform-complete
git fetch
There is a branch R2-2023-csp-4 (released on April 24, 2024). We will deploy this version. Check out this Branch. Stash local changes. This should only pertain to stripes.config.js . Discard any changes which you might have made on the install-jsons:
git restore install.json
git restore okapi-install.json
git restore stripes-install.json
git restore package.json

git stash save
git checkout master
git pull
git checkout R2-2023-csp-4
git stash pop
II.ii) Upgrade Okapi
Upgrade the Okapi version and restart Okapi. Read the Poppy Okapi version from install.json: okapi-5.1.2
Set JAVA_HOME in .profile if you haven’t already done so
  echo export JAVA_HOME=`readlink -f /usr/bin/javac | sed "s:bin/javac::"` >> ~/.profile
  source ~/.profile
Build Okapi from source
  cd /usr/folio/okapi
  git fetch
  git checkout v5.1.2
  mvn clean install -DskipTests=true
    ...
    [INFO] BUILD SUCCESS
If you have built Okapi from source for the first time you may need to adjust LIB_DIR in /etc/default/okapi so that the Okapi service script (/lib/systemd/system/okapi.service) will find the newly built jar file:
  edit /etc/default/okapi
  LIB_DIR="/usr/folio/okapi/okapi-core/target"
Restart Okapi
sudo systemctl restart okapi
Follow /var/log/folio/okapi/okapi.log .
Now Okapi will re-start your modules. Follow the okapi.log. It will run for 5 minutes or so until all modules are up again. Check if all modules are running:
docker ps | grep "mod-" | wc
  65
The above number applies if you had installed a complete platform of Orchid, previously.
Retrieve the list of modules which are now being enabled for your tenant (just for your information):
curl -w '\n' -XGET http://localhost:9130/_/proxy/tenants/diku/modules
...
}, {
  "id" : "okapi-5.1.2"
} ]
If you are starting with a complete platform of Orchid, you will see 9 Edge modules, 59 Frontend modules (folio_*), 65 Backend modules (mod-*) and the Poppy version of Okapi (5.1.2).
II.iii) Pull module descriptors from the central registry
A module descriptor declares the basic module metadata (id, name, etc.), specifies the module’s dependencies on other modules (interface identifiers to be precise), and reports all “provided” interfaces. As part of the continuous integration process, each module descriptor is published to the FOLIO Registry at https://folio-registry.dev.folio.org.
curl -w '\n' -D - -X POST -H "Content-type: application/json" \
  -d '{ "urls": [ "https://folio-registry.dev.folio.org" ]  }' http://localhost:9130/_/proxy/pull/modules
Okapi log should show something like
 INFO  ProxyContent         759951/proxy REQ 127.0.0.1:58954 supertenant POST /_/proxy/pull/modules okapi-5.1.2
 INFO  PullManager          Remote registry at https://folio-registry.dev.folio.org is version 5.0.1
 INFO  PullManager          pull smart
 INFO  PullManager          pull: 1440 MDs to insert
 INFO  ProxyContent         759951/proxy RES 200 32114437us okapi-5.1.2 /_/proxy/pull/modules
II.iv) Configure Module Environment Variables
This part is the one in which a system operator needs to take the most care and will probably spend the most time on.
Check your Okapi environment:
curl -X GET http://localhost:9130/_/env
At this point, (re-)configure the environment variables of your modules, as needed. Study the release notes for any changes in module configurations. Follow these instructions to change the environment variables for a module: Change Environment Variables of a Module.
Make sure SYSTEM_USER_PASSWORD in /_/env is the actual password for these system users:
- system-user
- pub-sub
- mod-search
- data-export-system-user
- mod-entities-links
- mod-innreach (if you are utilizing this module)
Log in as these users with this password. If that doesn’t work, change the password of these system users to the value of the system variable SYSTEM_USER_PASSWORD.
i. Set new global environment variables
Set the ENV var – only required in a multi-tenant environment If you are in a multi-tenant environment, set environment variable ENV to ENV = poppy . In a single tenant environment, you don’t need to set it . It has the default value ENV = folio.
curl -w '\n' -D - -X POST -H "Content-Type: application/json" -d "{\"name\":\"ENV\",\"value\":\"poppy\"}" http://localhost:9130/_/env
Set INNREACH_TENANTS - otherwise mod-inn-reach will not start for your tenant:
curl -w '\n' -D - -X POST -H "Content-Type: application/json" -d "{\"name\":\"INNREACH_TENANTS\",\"value\":\"diku\"}" http://localhost:9130/_/env
If you have multiple tenant, separate their names by “|” in the INNREACH_TENANTS variable’s value.
Make sure KAFKA_HOST and KAFKA_PORT are set in /env, otherwise mod-user will fail startup.
Set DB_CONNECTION_TIMEOUT to at least 250, otherwise mod-entities-links will fail startup.
ii. Incompatible Hazelcast version in mod-remote-storage
During the upgrade, the Orchid and Poppy versions of mod-remote-storage will run in parallel. This will only work if they are on different Hazelcast clusters. Set the Hazelcast cluster name for the Poppy version to “poppy”:
  # Configure mod-remote-storage-3.0.1 (Poppy version)
  cd ~/folio-install
  # 1. Copy the module descriptor into a file
  curl -w '\n' -D -  http://localhost:9130/_/proxy/modules/mod-remote-storage-3.0.1 > mod-remote-storage-3.0.1-module-descriptor.json
  # 2. Add env var in launch descriptor manually :
      "name" : "HZ_CLUSTERNAME", "value" : "poppy"
  # 3. Delete the module descriptor
  curl -X DELETE -D - -w '\n' http://localhost:9130/_/proxy/modules/mod-remote-storage-3.0.1
  # 4. Send the new module descriptor to /_/proxy/modules
   curl -i -w '\n' -X POST -H 'Content-type: application/json' -d @mod-remote-storage-3.0.1-module-descriptor.json http://localhost:9130/_/proxy/modules
iii. OAI-PMH (mod-oai-pmh) configuration.
Of course you only need to do this if you want to utilize the oai-pmh interface of your (test or demo FOLIO) instance. For stable operation, mod-oai-pmh requires the following memory configuration:
Java: -XX:MetaspaceSize=384m -XX:MaxMetaspaceSize=512m -Xmx2160m
Amazon Container: cpu - 2048, memory - 3072, memoryReservation - 2765
edge-oai-pmh memory settings remain the same as in previous releases:
Java: -XX:MetaspaceSize=384m -XX:MaxMetaspaceSize=512m -Xmx1440m
Amazon Container: cpu - 1024, memory - 1512, memoryReservation - 1360
iv. S3 storage compatible environment variables
Some modules make use of an S3 storage or compatible (AWS-S3 or minion server) persistent storage. mod-data-export-worker has been using it since some releases ago. Modules that now also make use of it are: mod-bulk-operations, mod-data-import - if you want to use the splitting functionality for large MARC21 import files, mod-oai-pmh - if you want to store error logs, mod-lists - in order to support exporting list contents. Set at least those env vars in these modules (edit the launch descriptor): S3_URL, S3_REGION, S3_BUCKET, S3_ACCESS_KEY_ID, S3_SECRET_ACCESS_KEY. Confer the documentation of these modules on github - these variables might be called AWS_URL etc. for some of the modules.
v. Set jwt.signing.key for mod-authtoken
In the launch descriptor of mod-authtoken-2.14.1, set jwt.signing.key in the JAVA_OPTION to the same value as you have set it in the Orchid version of mod-authtoken(2.13.0) :
      "name" : "JAVA_OPTIONS",
      "value" : "-XX:MaxRAMPercentage=66.0 -Dcache.permissions=true -Djwt.signing.key=folio-demo"
Poppy doesn’t support expiring tokens in the frontend, yet. Declare your tenants as legacy tenants or don’t set LEGACY_TOKEN_TENANTS and TOKEN_EXPIRATION_SECONDS in mod-authtoken-2.14.1 at all: (for details cf. the README of mod-authtoken)
 }, {
      "name" : "LEGACY_TOKEN_TENANTS",
      "value" : "*"
    }, {
      "name" : "TOKEN_EXPIRATION_SECONDS",
      "value" : "tenantId:diku,accessToken:600,refreshToken:604800;tenantId:mytenant,accessToken:3600,refreshToken:604800"
vi. Set env vars for mod-search-3.0.8
If you have set ENV = poppy, set KAFKA_EVENTS_CONSUMER_PATTERN for mod-search, using the value of ENV as a part of its value: KAFKA_EVENTS_CONSUMER_PATTERN = (poppy.)(.*.)inventory.(instance|holdings-record|item|bound-with)
If you have set ENV = folio, set KAFKA_EVENTS_CONSUMER_PATTERN = (folio.)(.*.)inventory.(instance|holdings-record|item|bound-with)
Set SEARCH_BY_ALL_FIELDS_ENABLED to “true” if you want to activate the search option “all” (search in all fields). By default, SEARCH_BY_ALL_FIELDS_ENABLED is set to “false”.
vii. Splitting functionality for data import
If you expect to have to process large MARC 21 import file, enable the splitting functionality of mod-data-import. Set S3-compatible environment variables of mod-data-import. Read the Release Note details.
viii. mod-source-record-manager
Set srs.record.matching.fallback-query.enable = true to prepare for the running of a post-upgrade script.
ix. mod-pubsub
Set SYSTEM_USER_NAME in mod-pubsub. Prevous default was “pub-sub”, but that fallback has been removed. Set it explicitely in mod-pubsub. Also set SYSTEM_USER_PASSWORD or use the global value in /env (if a global value has been set, this overrides the values in the launch descriptor).
x. mod-circulation
Integration with Kafka was added to mod-circulation. Make sure that environment variables KAFKA_HOST and KAFKA_PORT are set before upgrading the module.
xi. mod-agreements
Increase “Memory” in the Launch Descriptor of mod-agreements to 8 GB, if you want to connect FOLIO to GOKB.
  "dockerArgs" : {
      "HostConfig" : {
        "Memory" : 8589934592,
II.v) Run Pre-Upgrade Scripts
i. Call number migration
Run Step 1 of Call Number Migration.
ii. Authorities migration
Run migration script for existing authorities (if you have any) Authorities migration. Authorities were moved from mod-inventory-storage to mod-entities-links. This migration is required for moving existing records from one module schema to another.
III. Create new Frontend : Stripes
Create a new frontend (but don’t deploy it, yet). Install Stripes and nginx in a Docker container. Use the docker file in platform-complete/docker. Check if everything looks o.k. in platform-complete/docker. If you have successfully installed last time, you should not need to change anything. Just do a “git diff”.
cd ~/platform-complete
git diff
Check if docker/Dockerfile, docker/nginx.conf and stripes.conifg.js look o.k.
Build the docker container which will contain Stripes and nginx :
  docker build -f docker/Dockerfile --build-arg OKAPI_URL=http(s)://<YOUR_DOMAIN_NAME>/okapi --build-arg TENANT_ID=diku -t stripes .
Sending build context to Docker daemon  61.96MB
Step 1/21 : FROM node:18-alpine as stripes_build
...
Step 21/21 : ENTRYPOINT ["/usr/bin/entrypoint.sh"]
 ---> Running in 71e5acf59c42
Removing intermediate container 71e5acf59c42
 ---> 9c2c6b792eec
Successfully built 9c2c6b792eec
Successfully tagged stripes:latest
This will run for approximately 10 minutes. Build more Stripes docker containers for any other tenants that you might host.
IV. Deploy a new FOLIO backend and enable all modules of the new platform (backend & frontend)
Now do a snapshot of your system, so you will be able to replay the current status in case the upgrade fails. Users should stop working with the system now because after the new backend has been deployed, the front end will be incompatible to the backend and will need to be redeployed, too.
Deploy all backend modules of the new release with a single post to okapi’s install endpoint. This will deploy and enable all new modules. Start with a simulation run:
curl -w '\n' -D - -X POST -H "Content-type: application/json" -d @$HOME/platform-complete/install.json http://localhost:9130/_/proxy/tenants/diku/install?simulate=true\&preRelease=false
Then try to run with “deploy=true” like this.
curl -w '\n' -D - -X POST -H "Content-type: application/json" -d @$HOME/platform-complete/install.json http://localhost:9130/_/proxy/tenants/diku/install?deploy=true\&preRelease=false\&tenantParameters=loadReference%3Dfalse
This call fails because frontend modules can not be deployed (we do this call anyway). You will get a message “HTTP 400 - Module folio_developer-8.0.1 has no launchDescriptor”. But this call deploys all backend modules. It did not enable any backend modules.
You can follow the progress in deployment on the terminal screen and/or in /var/log/folio/okapi/okapi.log . Don’t continue before all new modules have been deployed. Check by executing
docker ps | grep mod- | wc
This number should go up to 131 before you continue. This number comprises of 65 backend modules from Orchid plus 66 new backend module versions from the Poppy release. There is 1 module which is present in both releases in the same module version and it has not been deployed twice: mod-rtac:3.5.0.
We finish up by enabeling all modules (backend & frontend) with a single call without deploying any. There is a choice of whether or not to load reference data (of the modules) upon enabeling them. There are pros and cons to either of the choice:
- If we don’t load reference data, reference data that have already been loaded and have been changed locally will be kept (which is good). However, if we don’t load reference data, any new reference data will not be loaded and we might need to load them manually after the upgrade process.
- If we do load reference data, local changes to reference data might become overwritten and will need to be corrected manually, later.
Because, according to Poppy Release Notes, mod-entities-links is required to deploy with tenant parameter ‘loadReference=true’, we here choose to load reference data for all modules . It is not possible to take mod-entities-links out of install.json and enable it separately, because then the system will run into interface incompatibility errors during enablement.
curl -w '\n' -D - -X POST -H "Content-type: application/json" -d @$HOME/platform-complete/install.json http://localhost:9130/_/proxy/tenants/diku/install?deploy=false\&preRelease=false\&tenantParameters=loadReference%3Dtrue
Repeat this step for any other tenants (who have enabled platform-complete) on your system.
If that fails, remedy the error cause and try again until the post succeeds. We will take care of old modules that are not needed anymore but are still running (deployed) in the “Clean up” section.
There should now be 131 modules deployed on your single server, try
docker ps | grep "mod-" | wc
65 of those modules belong to the Orchid release, 66 belong to the Poppy release and one module belongs to both releases.
Modules enabled for your tenant are now those of the Poppy release:
curl -w '\n' -XGET http://localhost:9130/_/proxy/tenants/diku/modules | grep id | wc
  141
This number is the sum of the following:
Poppy release:
- 62 Frontend modules
- 11 Edge modules
- 67 Backend modules
- 1 Okapi module (5.1.2)
These are all R2-2023 (Poppy) modules.
V. Start the new Frontend
Stop the old Stripes container:
docker stop stripes
docker rm stripes
Start the new stripes container. Redirect port 80 from the outside to port 80 of the docker container:
  cd ~/platform-complete
  sudo su
  nohup docker run -d -p 80:80 --name stripes stripes &
Clear browser cache. Log in to your frontend: E.g., go to http://<YOUR_HOST_NAME>/ in your browser.
-
Can you see the Poppy modules in Settings - Installation details ?
-
Do you see the right Okapi version, 5.1.2 ?
-
Does everything look good ?
Repeat these steps for the Stripes containers of any other tenants.
It is now possible to access the system via the UI, again. However, changes in permission sets and long-running migration jobs still need to be carried out before the system can be used productively. You may not see the inventory data, yet.
VI. Cleanup
Clean up. Clean up your docker environment: Remove all stopped containers, all networks not used by at least one container, all dangling images and all dangling build cash:
docker system prune -a
This command might run for some minutes.
Undeploy all unused containers: Delete all modules from Okapi’s discovery which are not part of the Poppy release. These are 64 modules of the Orchid release – all but mod-rtac-3.5.0.
Undeploy old module versions like this:
curl -w '\n' -D - -X DELETE http://localhost:9130/_/discovery/modules/mod-agreements-5.5.2
curl -w '\n' -D - -X DELETE http://localhost:9130/_/discovery/modules/mod-audit-2.7.0
...
curl -w '\n' -D - -X DELETE http://localhost:9130/_/discovery/modules/mod-z3950-3.3.2
Result
for Poppy CSP#4 67 backend modules, “mod-*” are contained in the list install.json. Those 67 backend modules are now enabled for your tenant(s). 67 containers for those backend modules are running in docker on your system.
Now, finally once again get a list of the deployed backend modules:
curl -w '\n' -D - http://localhost:9130/_/discovery/modules | grep srvcId | grep mod- | wc
67
Compare this with the number of your running docker containers:
docker ps | grep "mod-" | wc
  67
Perform a health check
curl -w '\n' -XGET http://localhost:9130/_/discovery/health
Is everything OK ?
Congratulations, your Poppy system is complete and cleaned-up now !
VII. Post Upgrade
From Poppy Release notes:
VII.i) Long Running Migration Scripts
1. Scripts for Inventory, Source Record Storage and Data Import Cleanup
The following scripts may be used for identifying and cleaning up records in FOLIO’s Source Record Storage and Inventory. More technical details are available via the title hotlink for each script. Scripts for Inventory, Source Record Storage and Data Import Cleanup
2. Call Number Migration
Run Step 2 of Call Number Migration. There are two Options for Step 2. The first option will take the system down for a significant period of time (depending on the collection size). Option 2 still may take a significant amount of time but is much less disruptive. The annoying part of Option 2 ist that Step 3 needs to be executed 16 times.
3. OAI-PMH
A new field “completeUpdatedDate” has been added to the instance schema. If you make use of the OAI-PMH API (mod-oai-pmh, edge-oai-pmh) execute scripts as documented in Migration scripts for OAI-PMH. Execution of the script takes approximately 5 hours for 8 millions instance records. The Update Step needs to be executed 16 times for each tenant, can be executed concurrently.
4. Populate marc_indexers for mod-source-record-storage
Run Scripts to populate marc_indexers version.
5. consortia environments
Some changes only apply to consortia environments. Cf. the Release Notes (Required Actions) for details. See Adding a new member tenant to a consortium.
6. Recreate OpenSearch or Elasticsearch index
Sometimes we need to recreate OpenSearch or Elasticsearch index, for example when a breaking change has been introduced to index structure (mapping). We must re-index after migrating to Poppy. It can be fixed by running reindex request:
Assure the following permission has been assigned to user diku_admin: search.index.inventory.reindex.post (Search - starts inventory reindex operation)
Get a new Token and re-index:
   export TOKEN=$( curl -s -S -D - -H "X-Okapi-Tenant: diku" -H "Content-type: application/json" -H "Accept: application/json" -d '{ "tenant" : "diku", "username" : "diku_admin", "password" : "admin" }' http://localhost:9130/authn/login | grep -i "^x-okapi-token: " )
  curl -w '\n' -D - -X POST -H "$TOKEN" -H "X-Okapi-Tenant: diku" -H "Content-type: application/json" -d '{ "recreateIndex": true, "resourceName": "instance" }' http://localhost:9130/search/index/inventory/reindex
Monitoring reindex process ( https://github.com/folio-org/mod-search#monitoring-reindex-process )
There is no end-to-end monitoring implemented yet, however it is possible to monitor it partially. In order to check how many records published to Kafka topic use inventory API:
curl -w '\n' -D - -X GET -H "$TOKEN" -H "X-Okapi-Tenant: diku" -H "Content-type: application/json" http://localhost:9130/instance-storage/reindex/{id}
Repeat the re-indexing process for other tenants that you might host on your server and have also migrated to Poppy.
VII.ii) Change Settings
1. OAI-PMH error logs storage Settings
If you have enabled OAI-PMH error logs storing, use the PUT /configurations/entries/ endpoint to configure e.g. the duration of how long error logs are being stored. Read the details here Backend Module OAI-PMH
2. Dashboard migration
After updating to mod-service-interaction 3.0.3 (included in Poppy CSP #1): With a user with the “Dashboard: Dashboard administrator” permission allocated do – use a Token and an x-okapi-tenant header as described above for the reindexing process :
GET <okapi base URL>/servint/admin/ensureDisplayData

Expected response:

200 OK
{
    "status": "OK"
}
3. Inventory and Orders configuration
All libraries must ensure they have Invalid ISBN resource identifier type in inventory configurations. If not they may have issues with editing order lines. Navigate to inventory settings and select resource identifier types. Ensure there is a type with the nameInvalid ISBN.
VII.iii) Update permissions
Update permissions as described in the Permissions Updates.
VII.iv) Manual Tests
- Login to the frontend, user=diku_admin, passwd=admin
- Delete browser cache (this is important, otherwise you will see the old frontend modules)
- Go to Settings page check against “incompatible interface versions”. There should be none. check if “Poppy CSP-4” is being displayed on the settings page
- check if circulation log can be downloaded (this checks if mod-data-export-worker works)
- check if emails are being sent (do a checkout for a test user)
- can you see the new Lists App ?
Congratulation, your system is ready!
Last modified September 20, 2024